Artwork Bleed
A very important thing to know, when you are having any kind of printing done the use of a bleed on your artwork gives your print that professional finish by giving you edge to edge printing.
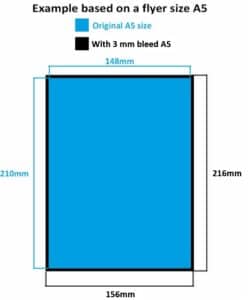
This is a fairly simple concept. your flyer is say A5 148 mm x 210 mm - you need to add bleed to each side of your artwork for the cutting after it has been printed, otherwise you will not get edge to edge printing you will end up with uneven white lines around the edge.
The are two ways to do this, depending on what you are using to create your work:
Method 1: You can add a 3mm bleed using your editing software.
Method 2: My preferred method is to make the artwork full size with the bleed already added, for example A5 again would be 148 x 210 mm, adding the size to the page would make it 154 x 216 mm giving it the extra 3 mm on all sides that will be cut off after print.
Two very important things for whichever method used:
- Always have the edges of your artwork, background, colour's etc pulled into the bleed
- Always make sure your important text etc is away from the edge especially when you use method 2
Below image shows in blue the actual image size of A5 and in black the size with the bleed added.
It is worth noting that different products require different bleeds.
Logos
Why its a good idea to keep logos simple
This is a logo rebuild, the fact that it is a simple logo makes it so much easier to recreate.
Top one was a photograph of a business , it was rebuilt as a high quality 300 dpi scale able image.
![]()
LOGO - Design
If you are thinking of having a logo done or even re-done a couple of things you should take note of when looking for the rite person to do the job.
Your logo needs to be designed in the CMYK colour palette it can be converted to the RGB palette from the CMYK version as this way there will be very few if any discrepancies in the colours.
Whoever does your logo should be able to supply you with, a JPG, a scale able file ie: SVG, .eps, True PDF basically a file type that can be scaled up for large format print without loosing its quality, also a PNG file for use online.
One of the issues I face regular are people that have gone for the easy option of having a logo done by some one who can only supply a jpg or a png. That is fine if you only ever intend it to be used online. But no good for print or large format print.
They also need to supply you with font names used on your logs text.
My Logo tips are:
- Keep it simple
- Only use a few colours, with no blending, no gradients no complex textures.
- Make sure who ever is doing it is competent enough to supply you with the files required.
- Choose colours or a design that will work with or without a background
- Once you start using your logo don't change it as it is your branding and how your are recognised.
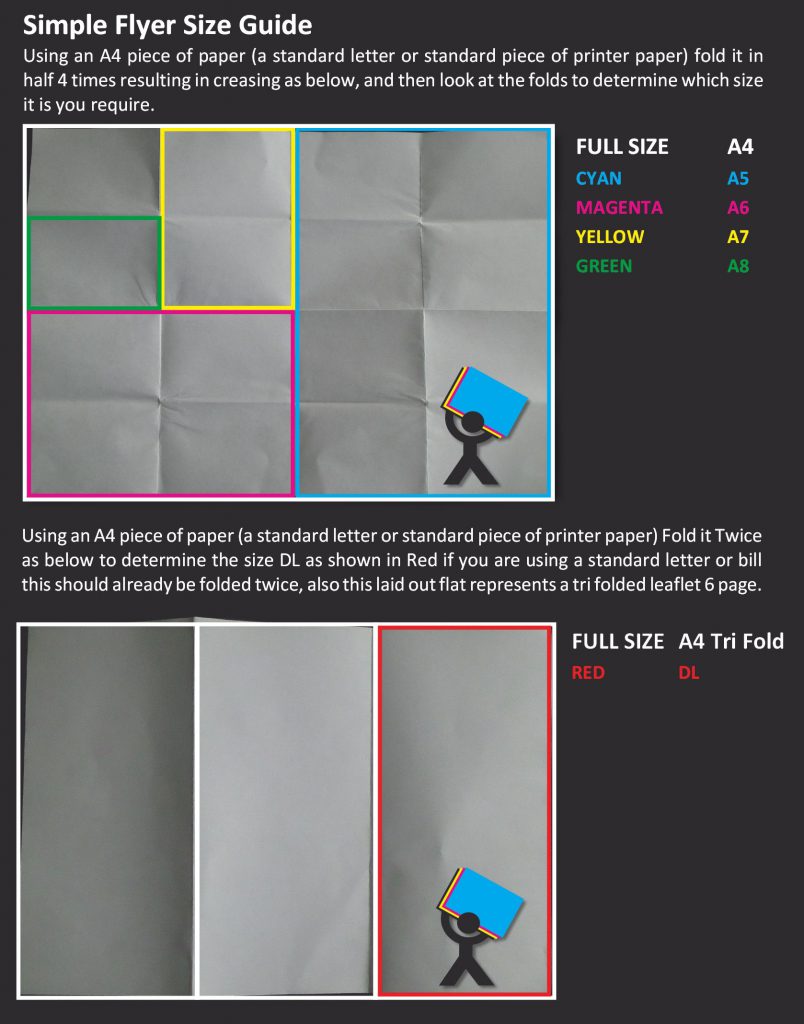
Size Guide
Below I have put together a simple guide to flyer sizes, for some bizarre reason the higher the number the smaller the size. But it is something a lot of people struggle with so I hope the below diagram helps. It is done with a standard A4 sheet of printer paper from a home printer. (you can click the image to view larger)